Troubleshooting and Tips
This covers some common issues you may encounter, as well as some tips. It's worth reading even if you aren't currently experiencing any issues.
Health Check
Start with the Health Check tab when something looks wrong. These checks identify missing required data, duplicate records, invalid settings, and values that no longer match valid dropdown options.
Errors will show a count and be highlighted in red, with an explanation and guidance to fix to the right of the count.
If all health check counts are green (zero), this does not guarantee no errors beyond what they are checking for. It cannot find missing transactions or incorrect values. That is up to you!
Making Changes to Dropdown Values
Changing a dropdown option at its source sheet does not update existing selections elsewhere. For example, correcting a name in Contacts updates the dropdown options, but older Journal entries will still contain the misspelled name. These mismatches can affect reports and donor statements.
After making a change, update the affected selections:
- Contact names, fund names, account names or numbers: update Journal and Recurring.
- Account group names or numbers: update Accounts/Budget.
- Translated Revenue/Expense labels: update Account Groups.
- Translated Restricted/Unrestricted labels: update Funds.
- Translated Posted/Pending labels: update Journal and Recurring.
Use Health Check and bright red highlighting to help find mismatched values. Correct each affected cell by selecting the updated option from its dropdown.

Restoring a Previous Version
If you encounter an error, and using “undo” isn’t fixing the issue for you, you may need to go back further in history to a time prior to the error.
Google Sheets has a handy tool to help with this type of situation called Version History. Versions of your workbook are automatically saved as you make changes.
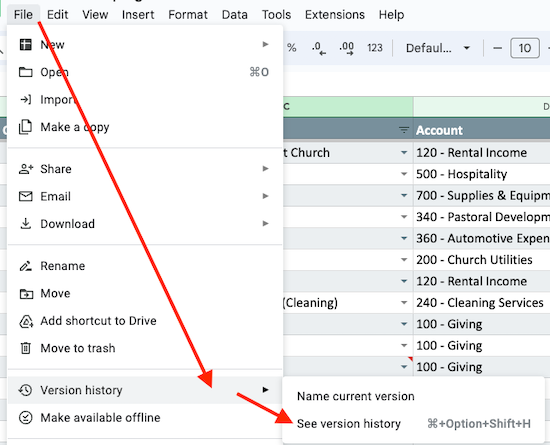
If you make an error and you’re unsure how to fix it, go to File > Version History > See Version History in the Google Sheets file menu.
Versions of your workbook will be shown at the right, with the most recent version at the top. Try not to go back any further than you need to. Select a version and it will show a preview of the version before you decide to restore it.
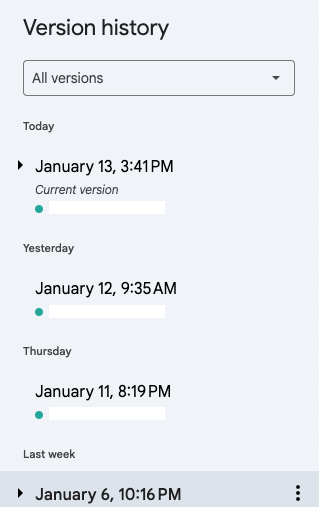
You can then click “Restore this version”.

Just know you will lose all changes you made between now and the version you restore to. So, while you may undo the error, you may also need to re-do some work depending on how far back you need to go to restore to a version without the error.
Accruals
While Mere Bookkeeping templates aren't designed to track accruals (accounts payable, accounts receivable) there are little workarounds that can help you track accruals on a limited basis - if you have lots of accruals, it is recommended that you use double-entry accounting software instead of Mere Bookkeeping.
Tracking accruals in a cash accounting system (like Mere Bookkeeping) is commonly called a "hybrid" system.
Example 1: Payroll Withholding:
1) Create a fund in your Funds sheet as a "Restricted" fund to track withholding.
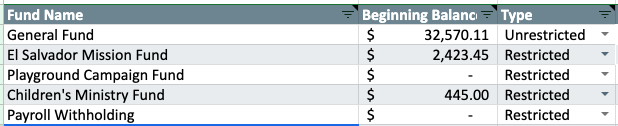
2) Create an expense account in your Accounts/Budget sheet with a $0 budget to track withholding.

3) Record a transaction for the "gross" salary expense.
4) Then, add another transaction to the withholding account and withholding fund. Enter the amount of withholding as a positive amount. It's a temporary increase to your cash balance because you're temporarily holding onto your employee's tax payment (taken out of their gross salary from the previous transaction) until a later date.
Since it's an expense account, the positive amount will be highlighted in yellow as an alert. Ignore this alert

5) Issue the payroll check for the difference between the salary expense and withholding.
6) Later, when it comes time to issue a check for the amount(s) withheld, enter another transaction to the withholding account and fund, using a negative amount to reverse the amounts withheld (typically returning the fund/account back to $0).

Example 2: Large, Annual Expense: Let's say you pay your insurance bill annually in October, and you estimate that it will be $6,000 this year. If this represents a fairly significant percentage of your annual expenses (more than 2%, let's say), you may want to spread this expense across the entire year, which would present a more accurate financial picture throughout the year.
To do this, you could simply enter a transaction in your journal at the end of each month for $500, to your insurance account. Leave the status as "Pending" (to ensure your bank reconciliation will balance since you haven't paid it yet).
Once you receive the invoice:
- Divide the actual expense by 12 to get your actual monthly expense.
- Update all prior transactions to the actual monthly amount.
- Add transactions for all future months for the same amount with the status of "Pending" (should have 12 total transactions, all the same amount, totaling the actual invoice, all pending at this point).
- Once the payment has cleared your bank account, update all 12 transaction statuses to "Posted" (including those in future months).
Your reconciliation will still work since the entire expense has a posted status - all posted transactions are reflected in reconciliation, even future dated posted transactions.
Your standard reports will continue to only show 1/12th the expense each month (reports don't show future dated transactions).
Migrating to a New Template
If you wish to migrate to a new Mere Bookkeeping template (either between fiscal years, or in the middle of one), you'll utilize copy/paste to move your entered data more quickly.
Go in this order when copy/pasting your data from your current workbook to your new workbook: Settings > Funds > Account Groups > Accounts/Budget > Contacts > Reconciliation > Recurring > Checklist > Journal > Date Controls > In-Kind Giving. Paying special attention to any new features that you'll need to update manually.
Only copy/paste the data you entered (not entire sheets or headings). If new columns have been added to the new version, make sure you align your copy/paste to the correct columns.
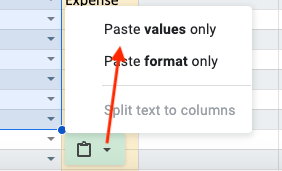
It is highly recommended that immediately after each paste into your new workbook that you click the clipboard icon that shows in the bottom right of the data just pasted, then click "Paste values only". This will reduce the chance of overriding any formatting or data validation in the new workbook.
Once done, compare some of your reports between the old and new workbook to see that the values look the same. If you determine something went wrong, you can try again with a fresh copy of the new template.
Any customizations you had created (beyond entering your own data in the standard cells) will need to be created in the new workbook if desired. You'll also need to share any reports in your new workbook that you previously shared with others (generating new share URL's).
When migrating within the same fiscal year, copy your existing transactions and beginning fund balances. When starting a new fiscal year, follow the new-year setup instructions instead: carry forward ending fund balances and begin with an empty Journal.
